Setting up your artwork:
Please read this before you send through your files. It is important that they are all set up correctly, otherwise you may incur extra costs for us to fix them, which may in turn delay their delivery.
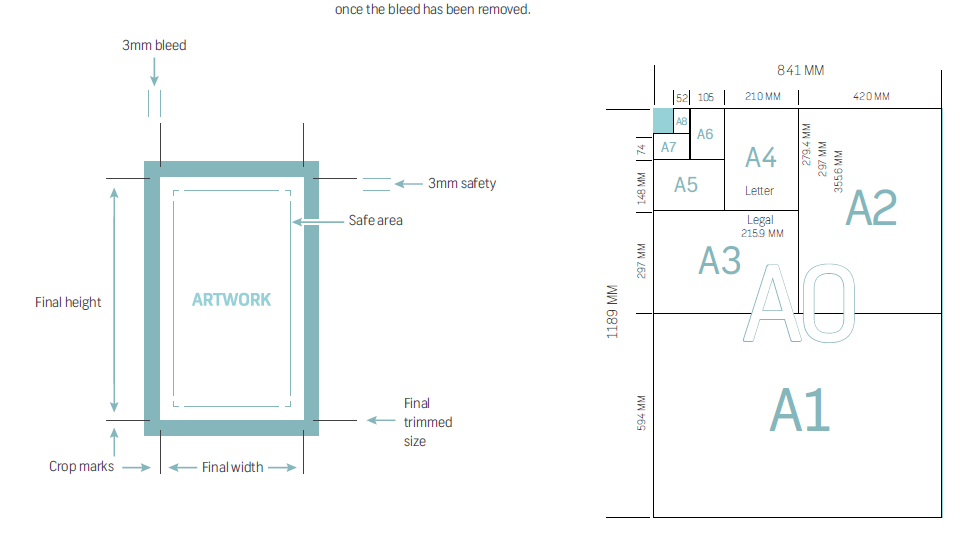
IMPORTANT: If your files do not comply to these specifications we can not guarantee that your job will be printed correctly or on time.
3mm of bleed is required for all jobs with a background colour, texture or image. If your artwork is not supplied with bleed, we may ask you to resupply it or will charge you for the time it takes us to correct it.
All digital flies must be flattened, i.e. all layers and vector graphics converted to outlines.
For this you will need a Vectorised artwork or you will have to create a vector cut line by hand.
1__Create an artboard in Illustrator that is about 6mm larger than the size then the final size.
2__Place or create your artwork in illustrator and create the shape to be profile cut.
3__Now make a new layer and call it ‘CutContour’ with the C’s capitalised. Copy the layer that the artwork is on and
turn off the original artwork layer.
4. If the artwork has text just outline the type. Now keep in mind that for this step we are only interested in the outline of the shape of the
artwork as a whole.
5__Once you have made the desired shape make the infill of the shape see through and the change the colour of the
outline to a 100% megenta spot colour that is named ‘CutContour’ again with the C’s capitalised. Also make sure that
the weight of the line is 1mm.
6__Once done move the original artwork layer below your cutline artwork layer and turn it on. Your outline should be
nicely hugging the artwork.
7__ You can lock the newly made cutline layer and copy the original artwork layer once again and put it behind all
your current layers.
8__ Now we need to create bleed we want to bleed and and all colour that is touching the cutline about 3mm past it
all the way around. You can do this on the new layer that we just place behind all the other layers.
9__ Once all this is done go to your first layer ‘CutContour’ and create a box the same size as the artboard. Once
again make sure the infill is see through and that the outline is the ‘CutContour’ Colour and weight.
10__ Now we can drag the Profile Cut line of the artwork onto the CutContour layer and delete the now empty layer.
11__ Finally we can save the file as a print ready PDF. Still keeping in mind to use the Illustrator default preset and
saving it with no crop mark and with 3mm of bleed around the document that should be empty.
Illustrator: To create a PDF, you can either “Save as” a PDF from illustrator or “Print to” a PDF file. To Save as: Use the Press Quality preset. Under the Marks and Bleeds tab, check Trim marks. Also in this tab, in the Bleeds section, put 3mm for each of the values. To Print to a PDF: Select Adobe PDF as the printer. Under the Marks and Bleeds tab, check Trim marks. Also in this tab, in the Bleeds section, put 3mm for each of the values.
InDesign: To create a PDF, you need to use the File > Export option. Always use the 'Press Quality' preset. Under the 'Marks and Bleeds' tab, check 'Trim marks'. Also in this tab, in the 'Bleed' section, put 3mm for each of the values.
Photoshop: Set up your document size to include bleed. E.g. if your final printed piece is to be A7 (74 x 105mm) make your Photoshop document 80 x 111 mm. To create your PDF: Select File > Print then select Adobe PDF as the printer. Click the 'Page Setup' button, in the Adobe PDF Settings tab, select 'Press Quality' in the Default Settings dropdown. In the Adobe PDF 'Page Size' section, you will need to add a custom paper size 10mm larger than your Photoshop document, click 'Add/Modify' and select the new page size you created, click 'OK'. In the 'Position' section, ensure that the 'Center Image' option is checked. The 'Scaled Print Size' option should be 100%. In the 'Output' tab check the corners for 'Crop Marks'. Click 'Bleed' and enter 3mm as the value. Click 'Print' and your PDF will be created. Please note that this will not make your file completely print ready, but sets it up as best as photoshop allows. Our pre press team will then need to finalise the process to make your file print ready.
Canva: When designing in Canva for print, there are some limitations that are essential to keep in mind. One of those limitations is that, like other design programs, Canva can only save RGB files. Since we print with ink (CMYK), our system will convert your colors to the closest CMYK profile. The second limitation is that you must build your bleed into your document from the start.
To help you through this process we have provided below a step-by-step guide to designing a print ready file using Canva.
1_Setting Up Your Canvas
The most important part in this process will be starting with the correct size in Canva. The paid version of Canva will let you resize files but the free version will not. We do recommend using Canva Pro if possible.
You’ll want to create a new document and select ‘Custom Size.’ This will look slightly different depending on if you are working on the desktop version versus the web version.
For the website version go to ‘Create Design’ and click on ‘Custom Size’ in the dropdown menu.
For Click on the ‘+’ icon and select ‘Custom Size’ in the dropdown menu. From here there will be another dropdown menu and you can put in your size. Make sure you select "mm" and then add 3mm bleed.
If you pick a template you can click "Resize" if using Canva Pro.
2_Create your design
You can create a design from scratch or use a provided canva template. The options will depend on whether you have the free version of Canva Pro.
3_Exporting print ready files
Once your Design is complete, it’s time to download it! Click on ‘Share’ in the top right and a drop-down menu will appear. Then you can click on ‘Download’ and you will see some options in the ‘File type’ menu. Here is what you want to select.
- PDF Print
- Crop marks and bleed
- CMYK
* Do not click "Flatten PDF" as it will make it low resolution and you won't be able edit any text or vector elements.
4_Congratulations you have made a print ready file!








Fast Print Services would like to Acknowledge the Gadigal people,
the traditional
custodians of this land on which we work, and pay our respect to the elders both past and present.
